Tip of the week – Using the summary view of a contact’s profile


Rapid turnaround time is one of the key ingredients to providing exceptional support to your contacts.

The ability to achieve this rests on a number of factors, one of them being the ability to gauge a contact’s past ticket history and profile, prior to resolving a reported issue.

With this in mind, we’ve linked the Contact entry on each ticket box with the Contacts Manager. This now allows you to view important contact related information, right on the ticket.

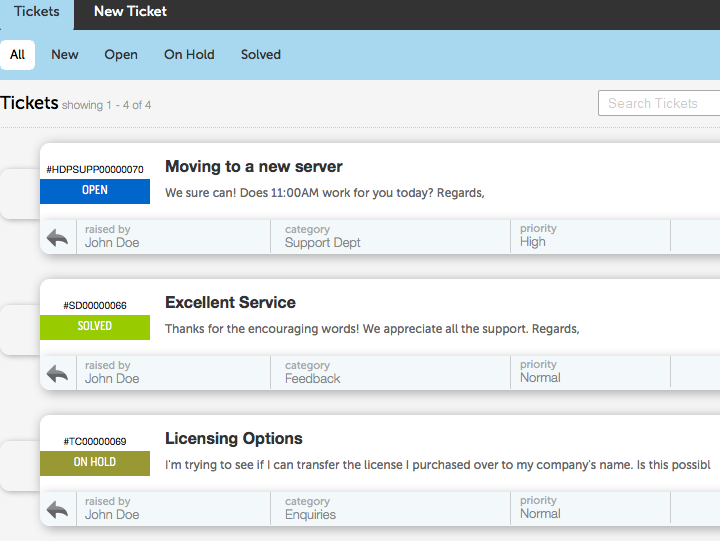
To access this summary view, (both in the Ticket View & Ticket Detail pages) simply click on the contact name that’s displayed on the ticket box:

Screen_shot_2011-07-14_at_11

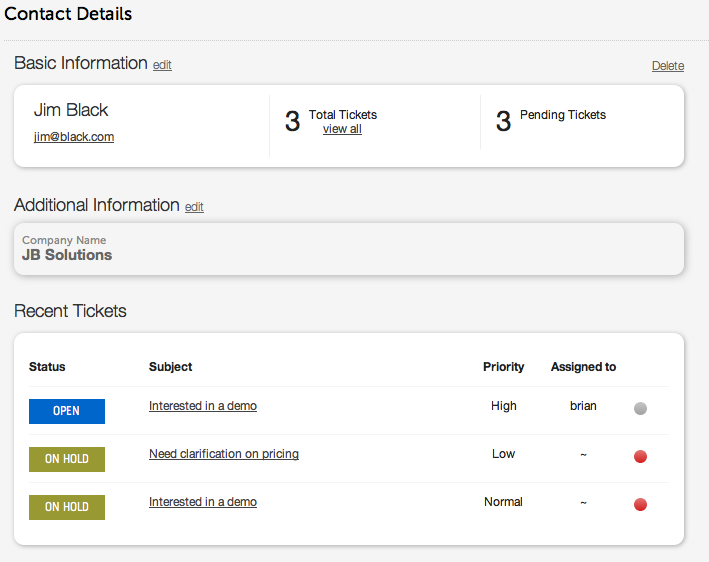
This brings up a drop-down view with key stats on the contact:

Screen_shot_2011-07-14_at_11

You’ll notice that there are two individual ticket counts in the summary view:

– total number of tickets that the contact has submitted till date, using the displayed email ID

– number of tickets that are in a pending (open) state

Having this information may be sufficient enough for help desk staff to begin resolving the reported issue. For example, a contact may have indicated that he/she has sent in multiple requests that are yet to be resolved. A brief look at the number of open tickets for that contact serves as a handy check.

In the event that a more detailed view of a contact’s profile is necessary, click on the email ID to navigate to the profile within the Contact’s Manager. 

We’d love to know how the summary view assists your help desk operations. Leave us a comment!


How to : Manage your Contacts


A recent feature addition now provides you with the ability to view all help desk contacts and manage their individual profiles.

Any client, customer, end user or ticket requestor is essentially a contact and each contact is identified on the help desk by their unique email ID. To access the Contacts Manager within Helpdesk Pilot, log in to your admin/staff interface and click on the “Contacts” tab.

Screen_shot_2011-07-06_at_3

Contacts are initially displayed in a list format, detailing the Name, Email Address and the number of tickets that a specific contact has submitted till date. Clicking on the contact’s name will bring up a complete profile along with their ticket history:

Screen_shot_2011-07-06_at_3

You’ll probably notice a sense of familiarity when viewing a client’s profile, since it displays key information in a similar format as the Dashboard. Through the contact’s profile, you can view :

– all tickets that a contact has submitted till date

– additional information linked to a contact via any client custom fields that you’ve set up. This could include details such as the contact’s Company Name, Phone Number, etc. 

– the most recent tickets that have been submitted, along with a snapshot of important ticket details such as Assignee, Priority & the presence (or absence) of The Red Dot.

In the event a contact’s details need to be updated, merely click on the “Edit” link along side the Basic & Additional Information sections.

The Contacts Manager, therefore, serves as a simple means to both maintain contact profiles and easily filter through to tickets submitted by a specific content. 


Tip of the week – Selecting a color for your custom status


Using custom statuses, you can replicate your business processes as closely as possible and more efficiently identify tickets in your help desk. Being able to visually identify a ticket’s status through a brief glance is aided with the custom colour options for each status that you create.

The add/edit status form allows you to define a preferred color for the status, aside from other status related settings. Till recently, the hexadecimal HTML color code had to be entered to have the relevant color assigned to that status.

We’ve now made it even easier to select a color for any custom status that you create. Simply enter the name of the color you wish to use for the status and you’ll see it appear right alongside the color field. (If you still prefer to use HTML codes, you can!)

Screen_shot_2011-05-18_at_4


In this example, the “Open” status has been set to be displayed in “Blue”. Any tickets in the queue that are placed in the “Open” status can then be visually identified, by merely looking at the status color.

Screen_shot_2011-05-18_at_5

With regular help desk usage, it’s quite natural to identify a ticket by glancing at the status color rather than the status name itself. Such visual associations then make it easier to navigate through one’s ticket queue and easily stay abreast of the current state of any ticket.

Are you using custom statuses? Let us know. 


Latest updates available on the Free 15-day Trial


Here is a list of some of the new features, enhancements and fixes that we have pushed out to all our trial accounts. Haven't signed up for a trial yet? Do it now.

New features:

Improved Search with emphasis on ticket ID, tags, end user information
Sorting tickets on Tickets view page by Last updated, ticket ID and Priority
Category filtering of tickets on Tickets view page

Enhancements:

Security fixes
Allowing users to have their installation with SSL (This is not available on the trials)
Allowing longer custom field labels
Increased limit on handling of incoming emails
Better attachment file name and file structure when Download all attachments is used

Bug Fixes:

Fix for handling non-ascii attachment file names
Custom fields fixes
Minor UI enhancements
Fix inadvertent un-assigning of ticket while performing other actions

Stay tuned for some more updates, in the coming weeks!


Tip of the week – Choose the number of tickets to be displayed on a single page view


Following up to the flexible My Queue feature that we covered last week, we’ve got another handy tip related to customizing each help desk staff member’s user interface.

Preferences typically vary from one support staff to another, in the manner in which they would like information to be displayed to them.

One of your staff members may wish to have as low as 5 tickets displayed in a single page view; another may prefer to have 20 in a single page, to make it easier to navigate through their support activities.

Helpdesk Pilot understands this need and allows each of your staff members to define the preferred number of tickets per page view. Albeit a simple one, this custom setting contributes significantly in offering help desk staff members with an ambient user interface. 

The “My Settings” page within each staff panel offers a setting to define the number of tickets per page.

Screen_shot_2011-04-13_at_4

Once set, the tickets view page will display all tickets in the help desk according to the number of tickets per page breakup, for that specific staff member. Remember, each of your staff members can have their own preferred view! (This page view would extend across all the status filters as well)

Did you find this useful? Leave a comment and let us know!


My Queue – First things first


As a part of the what’s new series, we look at the My Queue feature which provides all your help desk staff with a view to attend to the most important tickets, as determined by them. 

The My Queue is a customized view of the Tickets view page, where the order of tickets can be determined by the staff according to their role in your organization and the categories that they have access to. 

To begin, the My Queue should be set on the Staff profile page. Log in, as you normally would, and click on My Settings. Scroll to the bottom of the page and click on the ‘+’ icon in the My Queue section. You will see three drop downs, like this. 

Screen_shot_2011-04-08_at_1

You can choose the category from which you’d like to see tickets first, using the first drop down. Choose the status of the ticket, from the second drop down and the current assignment status of the ticket from the third.

A bit more on the status of the ticket – each status in Helpdesk Pilot is either a ‘pending’ state or a ‘completed’ state. Among the default statuses, Solved and Closed are completed statuses. The other default statuses shipped are pending states. You can choose a state of tickets in the second drop down, which would include all tickets that fall in that state.

The second drop down also has a value called ‘unresponded’, which allows you to choose tickets which have not yet been responded to by your help desk staff.

You can choose the tickets assigned to you first if you’d like to see them at the top of your list. Help desk staff who only assign tickets to other staff in various categories, can set up the queue to view unassigned tickets first, for example. 

You can set up as many rows as you want and the tickets corresponding to each filter will appear one below the other on the Tickets view page. 

Screen_shot_2011-04-08_at_5

 The example above shows a queue, where a staff has configured All pending tickets, assigned to them, from any category first and then All pending tickets, of any assignment, in any category.

Think this is useful? Leave us a comment.


Brand your help desk


Did you know that Helpdesk Pilot is made up of two separate web interfaces?

1. The Staff interface, which your help desk staff would use to view and respond to tickets

2. The End User interface, which your end users/customers would use to submit new tickets and view responses to tickets they’ve raised in the past

Given the ability to customize the request submission forms for each of your categories, the end user interface serves as a comprehensive ticket management portal and represents your help desk’s online image.

With that in mind, we’re sure you’d want your end users to have the comfort of knowing that they’re on familiar ground when they access your help desk. A standard feature on Helpdesk Pilot allows you to upload your corporate logo and brand the help desk in your name.

Screen_shot_2011-04-07_at_11

If you’re currently evaluating Helpdesk Pilot by way of our free trial, you can brand the staff & end user interfaces right away! Navigate to the General Settings page (within the Manage tab) to get started!

Yet another step in ensuring your help desk reflects your corporate image!


Give your end users and customers a look at Helpdesk Pilot too!


Now, your end users, clients, customers (as the case may be) can have their own login to the end user panel in Helpdesk Pilot. 

This panel is accessible on your trial at http://[your trial account name].helpdeskpilot.net, while the staff panel can be accessed at http://[your trial account name].helpdeskpilot.net/staff.

What you should know about the End User Panel:

* When an end user creates a ticket via any of the following modes:


-email
-end user panel submit new ticket form
-embeddable web form

or when a ticket is created on behalf of your end user, from the new ticket page on the staff panel, the end user will receive a notification (Contact Account invite). The end user merely needs to click on the activation link in this notification to activate their account and set the password. 


Media_httpdldropboxco_ewtbe

* End users may begin the whole process by also registering themselves first

* First time users to your helpdesk can go ahead and create a ticket first, in turn registering themselves
* The contents of this email and when this should be sent can be controlled under the Manage >> Notifications section on the admin panel.

* Once the activation is done, your end users can login to the end user panel and view the tickets that have been raised by them in the past.

Media_httpdldropboxco_tnbgs
* End users can see all their tickets in their current status, in the same conversation view as in the staff panel

Media_httpdldropboxco_xenne
* Status filters are available for customers too

* They can reply to the ticket from the Ticket detail page

* New tickets can be created from the New ticket form, by clicking on the New ticket tab

* All ticket specific custom fields (that were filled by them, while raising a ticket via any of the forms) will be visible on the Ticket detail page

* All contact specific custom fields, can be viewed and edited on their individual My Settings page

* End user panel supports LDAP mode login too! Helpdesk Pilot currently supports Active directory and Open LDAP

* End users can change their email ID, password, localization settings (timezone) in the My Settings page

Media_httpdldropboxco_zecue
What’s coming:
  • More controls and features on the customer panel
  • Admin section to manage all end users
  • A fully functional Knowledge Base module, which works closely with the end user panel, and more!
Looking forward? Absolutely. We are too.


The simplest way to convey the Helpdesk Pilot experience


In addition to all the product information that’s available on our website, the full-featured trial that we offer is aimed at offering prospective customer’s a hands on feel of Helpdesk Pilot.

Typically, a successful evaluation by a trial user is followed by an internal presentation within their company, where senior management are introduced to the product and its capabilities. In most cases, the management team are faced with time constraints and would ideally prefer to have the key points made aware to them, rather than a complete product review. 

We’ve recently noticed that our stop motion video has done extremely well as the opening video in client presentations. A number of trial users have successfully used the video to introduce Helpdesk Pilot to their management team and cover the key functionalities. In less than 3 minutes, the entire Helpdesk Pilot experience can be conveyed in a simple yet creative manner.

[youtube http://www.youtube.com/watch?v=a-JG4Qa5x2g?wmode=transparent]

So if you have an upcoming Helpdesk Pilot presentation planned, do consider using the video as an aid. 

If you need any other collateral (such as brochures, case studies or technical information) that you feel would strengthen your presentation, please let us know. We’d be glad to assist in any way that we can.


Tip of the week: Re-open closed tickets


Existing users of Helpdesk Pilot may be aware of a setting in the older versions, which allowed you to set whether a closed ticket should be re-opened, when a customer replies to it. This was particularly useful, not to lose track of closed tickets, especially if the option to hide closed tickets in the ‘All’ view was enabled. 

On the other hand, you might not have always wanted to re-open closed tickets. Consider a situation where your staff closes a ticket after responding to the customer with a resolution. The customer then replies with a Thank you message, thus re-opening the ticket.

In V5, Helpdesk Pilot does not have both of these options(yet). However, with the all powerful Smart Rules you can have the setting to re-open closed tickets on customer reply simulated.

Go ahead and set a rule with the conditions, 

If Status is Closed and If Time since unresponded customer reply is 1 minute (the least interval possible), then, Set Status to Open (as shown in the screenshot below)

Media_httpdldropboxco_pniec

This will ensure that tickets which have been closed, reopen after a minute of a customer’s reply. 

What other Smart rules do you use? Let us know.