Looking ahead to 2012


It’s that time of the year again, when we look at the calendar and count down the last few days of the year, eagerly looking forward to ushering in a new one. There’s an enticing feeling that comes about, when you know a new year is upon you and that it’s the right time to wipe the slate clean and start afresh.

2011 for us, was a big year.

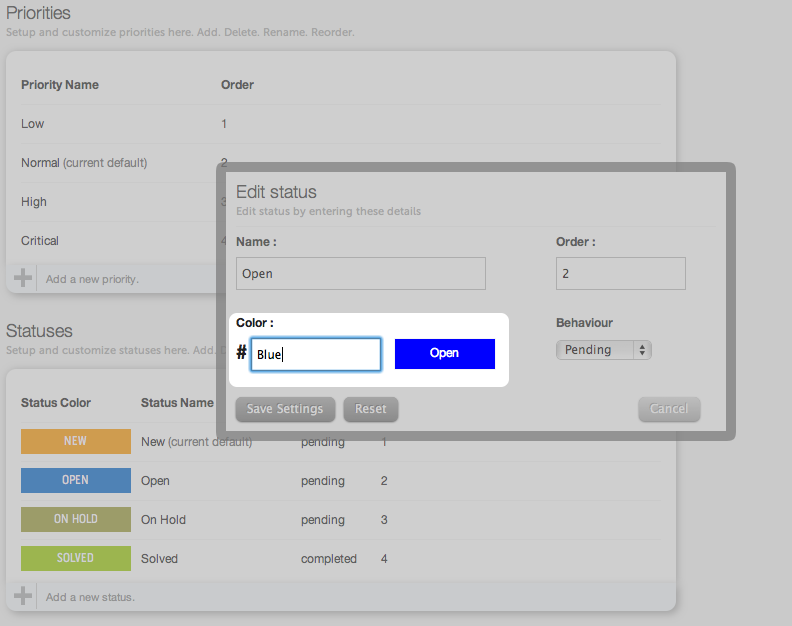
We launched the fifth major release of Helpdesk Pilot this year, marking V5 as the most significant update to the product ever. It wasn’t just an update, but a new avatar of our help desk management software, as we rebuilt the product on a new architecture with significant new features and capabilities over it.

We’ve been receiving great feedback from all our users and it’s helped us in channeling our development roadmap for the next year. During 2011, we were able to consistently roll out new features and enhancements on a monthly basis, which has progressively improved the capabilities that Helpdesk Pilot has to offer.

Support teams can manage their performance goals as a part of their service offering, create and maintain work orders, cater to tickets efficiently whilst out on the field, and more.

Our Enterprise Edition has been a winner in numerous large scale help desk deployments across the USA & Europe, both for its feature packed status as well as its affordability. As more and more businesses look to trim costs but continue to maintain, and excel, in core areas such as support services, Helpdesk Pilot remains a powerful product to help them achieve that.

We can’t wait to bring more powerful capabilities your way, to empower your support services even more. It’s been a great year so far and we’re sure 2012’s going to be even better.

Thanks for supporting us and being a part of this growth. From all of us at Tenmiles, here’s wishing you a Merry Christmas and a rocking new year!


Provide your techs in the field with printed service requests


As part of your support offering to customers, it may be necessary for your techs to personally visit the customer’s premises, look into the request and resolve it. In such cases, your techs need to have prior information on the customer and the ticket he/she raised.

Within Helpdesk Pilot, the ticket is displayed with relevant customer and ticket specific information as well as the communication exchanged between the customer and your support staff, in a conversational view.

This format looks great when viewed on your support staff’s 17″ LCD screen, but techs in the field need a simple template to work with.

Helpdesk Pilot has a print-friendly ticket view that extracts all the details on a ticket and displays it in the following tabular format, well spaced for easy viewing:

Each ticket can then be printed in A4 format and handed over to your techs in the field, for use during their daily support calls.

Going one step further, the print view can be exported in a PDF format and used as a more concise, digital version of the original ticket. Many organizations now outfit their techs with tablets (such as the iPad) in a move to be more environmentally friendly.

Therefore, techs can easily download their assigned set of service requests and refer to them whilst in the field, doing away with the need for actual paper based printouts.


Get a quick overview of the benefits that Helpdesk Pilot has to offer


On the lookout for a help desk management software and pressed for time?

We’ve put together a short presentation that highlights the key features that Helpdesk Pilot provides, along with an indication on how they could potentially fit in line with your workflows.

A minute or two is all you need to browse through this overview, for a detailed insight on Helpdesk Pilot.

If you have any specific queries with regards to requirements that you’d like to implement, feel free to get in touch with us. We’d love to chat and learn more of your needs.


The Power of Helpdesk Pilot on the cloud


Helpdesk Pilot is offered as a deployable software, that you can install and manage on your server. This is the favoured route for many businesses that prefer to have their applications managed in-house rather than have it hosted by the service provider.

If, however, you prefer a hosted help desk solution, then we invite you to consider HappyFox

HappyFox is essentially Helpdesk Pilot on the cloud and offers the same level of functionalities, in a hosted format. Both these products share a common development roadmap, with similar feature sets that are rolled out on a regular basis. 

Our objective is to offer two delivery channels for our help desk management software, to cater to the individual needs of your business. Whether it’s Helpdesk Pilot or HappyFox, you’re assured of a trusted and feature rich application managing your help desk operations.


Tip of the week – Creating a customized welcome page for your help desk


A while back, we highlighted how your help desk can be branded with your corporate logo and name. This gives your end users a familiar feeling when they visit the help desk for their support needs, but we thought that it may be worthwhile to go a step further.

You can now include customized content on the welcome page, to convey any additional information to your end users.  

The highlighted area of the screenshot below indicates the content section that can be customized:

Screen_shot_2011-07-21_at_3

To add your customized content, navigate to the General Settings page (within the Manage tab of your Admin interface). In addition to normal text, the HTML enabled editor allows you to make use of HTML tags to build your desired content.

Perhaps an indication of your help desk’s operating hours and timelines for support responses? With a link to contact a Customer Support Manager for any critical issues?

Or maybe a more personalized guideline on how they can use the help desk to submit their requests and/or browse the Knowledge Base?

So go ahead and speak out through your help desk. Yet another step in ensuring that your help desk reflects your corporate image as much as possible.

We have a few customers who’ve put some creative thought in the messages they wish to convey and we’ll be covering some of them on the blog, shortly.


Creating a self-service help desk using the Knowledge Base


Knowledge Base : A special kind of database for knowledge management, providing the means for the computerized collection, organization, and retrieval of knowledge” – Wikipedia

The latest feature addition to Helpdesk Pilot allows you to achieve this, by creating and managing an online repository of information that your end users can access. 

The Knowledge Base is a standard feature across all editions of Helpdesk Pilot and integrates seamlessly to provide your end users with a self-service help desk. 

Kb

Once end users visit your help desk, they can choose to :

  1. Create a new ticket
  2. Log in to their account to view past tickets and responses
  3. Access most viewed articles
  4. Search & browse the Knowledge Base for relevant technical assistance

Let’s delve a bit deeper into that last point.

Search & Browse the Knowledge Base

The basic crux of any support request is the need for some form of assistance, which is typically sought once a support request is submitted. However, the presence of a Knowledge Base serves as a powerful online reference medium for your end users to consult. By categorizing various aspects of your support services into identifiable sections on the Knowledge Base, your end users can intuitively locate articles that are relevant to the type of issue they’re facing.

Screen_shot_2011-07-18_at_3

Resourceful Articles

Effective technical documentation and support oriented articles can be built using a rich text editor, that allows you to make use of multiple media sources.

Insert images and video to create step by step troubleshooting guides. If you’re well versed in HTML, make use of the HTML editor to build a more customized article pulling in references from other web sources.

Kbarticle

The Knowledge Base is available on our full featured trial, which you can sign up for here. (If you already have an active trial, log into your admin interface and click on the Knowledge Base tab to get started)


Tip of the week – Using the summary view of a contact’s profile


Rapid turnaround time is one of the key ingredients to providing exceptional support to your contacts.

The ability to achieve this rests on a number of factors, one of them being the ability to gauge a contact’s past ticket history and profile, prior to resolving a reported issue.

With this in mind, we’ve linked the Contact entry on each ticket box with the Contacts Manager. This now allows you to view important contact related information, right on the ticket.

To access this summary view, (both in the Ticket View & Ticket Detail pages) simply click on the contact name that’s displayed on the ticket box:

Screen_shot_2011-07-14_at_11

This brings up a drop-down view with key stats on the contact:

Screen_shot_2011-07-14_at_11

You’ll notice that there are two individual ticket counts in the summary view:

– total number of tickets that the contact has submitted till date, using the displayed email ID

– number of tickets that are in a pending (open) state

Having this information may be sufficient enough for help desk staff to begin resolving the reported issue. For example, a contact may have indicated that he/she has sent in multiple requests that are yet to be resolved. A brief look at the number of open tickets for that contact serves as a handy check.

In the event that a more detailed view of a contact’s profile is necessary, click on the email ID to navigate to the profile within the Contact’s Manager. 

We’d love to know how the summary view assists your help desk operations. Leave us a comment!


How to : Manage your Contacts


A recent feature addition now provides you with the ability to view all help desk contacts and manage their individual profiles.

Any client, customer, end user or ticket requestor is essentially a contact and each contact is identified on the help desk by their unique email ID. To access the Contacts Manager within Helpdesk Pilot, log in to your admin/staff interface and click on the “Contacts” tab.

Screen_shot_2011-07-06_at_3

Contacts are initially displayed in a list format, detailing the Name, Email Address and the number of tickets that a specific contact has submitted till date. Clicking on the contact’s name will bring up a complete profile along with their ticket history:

Screen_shot_2011-07-06_at_3

You’ll probably notice a sense of familiarity when viewing a client’s profile, since it displays key information in a similar format as the Dashboard. Through the contact’s profile, you can view :

– all tickets that a contact has submitted till date

– additional information linked to a contact via any client custom fields that you’ve set up. This could include details such as the contact’s Company Name, Phone Number, etc. 

– the most recent tickets that have been submitted, along with a snapshot of important ticket details such as Assignee, Priority & the presence (or absence) of The Red Dot.

In the event a contact’s details need to be updated, merely click on the “Edit” link along side the Basic & Additional Information sections.

The Contacts Manager, therefore, serves as a simple means to both maintain contact profiles and easily filter through to tickets submitted by a specific content. 


Tip of the week – Selecting a color for your custom status


Using custom statuses, you can replicate your business processes as closely as possible and more efficiently identify tickets in your help desk. Being able to visually identify a ticket’s status through a brief glance is aided with the custom colour options for each status that you create.

The add/edit status form allows you to define a preferred color for the status, aside from other status related settings. Till recently, the hexadecimal HTML color code had to be entered to have the relevant color assigned to that status.

We’ve now made it even easier to select a color for any custom status that you create. Simply enter the name of the color you wish to use for the status and you’ll see it appear right alongside the color field. (If you still prefer to use HTML codes, you can!)

Screen_shot_2011-05-18_at_4


In this example, the “Open” status has been set to be displayed in “Blue”. Any tickets in the queue that are placed in the “Open” status can then be visually identified, by merely looking at the status color.

Screen_shot_2011-05-18_at_5

With regular help desk usage, it’s quite natural to identify a ticket by glancing at the status color rather than the status name itself. Such visual associations then make it easier to navigate through one’s ticket queue and easily stay abreast of the current state of any ticket.

Are you using custom statuses? Let us know. 


Tip of the week – Choose the number of tickets to be displayed on a single page view


Following up to the flexible My Queue feature that we covered last week, we’ve got another handy tip related to customizing each help desk staff member’s user interface.

Preferences typically vary from one support staff to another, in the manner in which they would like information to be displayed to them.

One of your staff members may wish to have as low as 5 tickets displayed in a single page view; another may prefer to have 20 in a single page, to make it easier to navigate through their support activities.

Helpdesk Pilot understands this need and allows each of your staff members to define the preferred number of tickets per page view. Albeit a simple one, this custom setting contributes significantly in offering help desk staff members with an ambient user interface. 

The “My Settings” page within each staff panel offers a setting to define the number of tickets per page.

Screen_shot_2011-04-13_at_4

Once set, the tickets view page will display all tickets in the help desk according to the number of tickets per page breakup, for that specific staff member. Remember, each of your staff members can have their own preferred view! (This page view would extend across all the status filters as well)

Did you find this useful? Leave a comment and let us know!