Tip of the week – Creating a customized welcome page for your help desk


A while back, we highlighted how your help desk can be branded with your corporate logo and name. This gives your end users a familiar feeling when they visit the help desk for their support needs, but we thought that it may be worthwhile to go a step further.

You can now include customized content on the welcome page, to convey any additional information to your end users.  

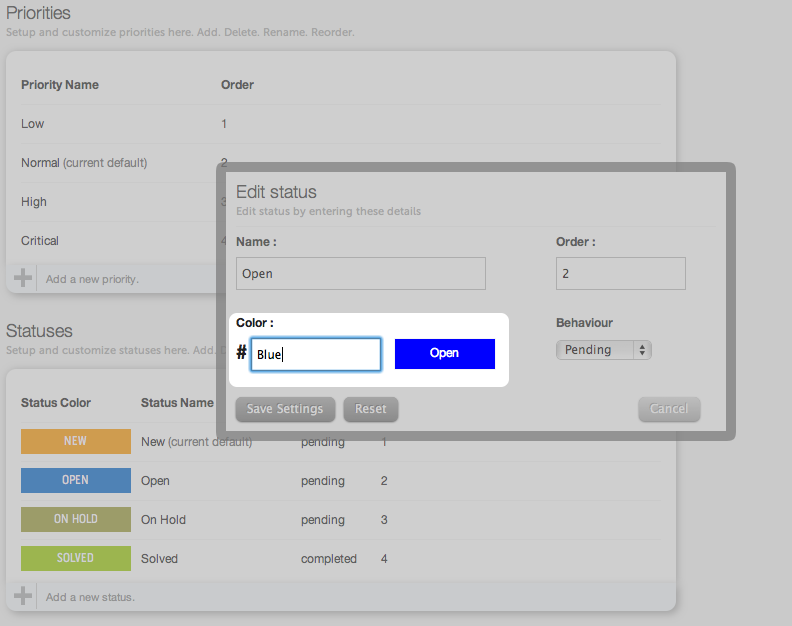
The highlighted area of the screenshot below indicates the content section that can be customized:

Screen_shot_2011-07-21_at_3

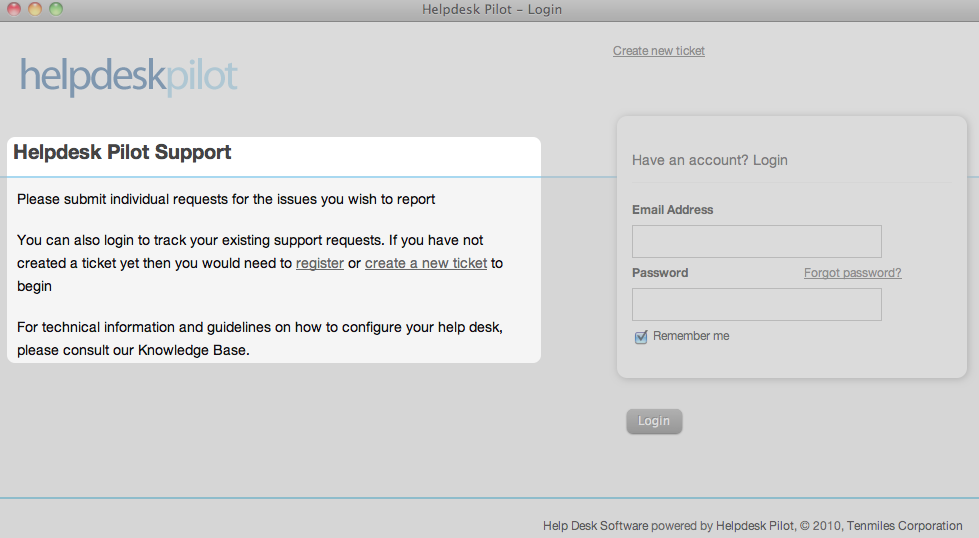
To add your customized content, navigate to the General Settings page (within the Manage tab of your Admin interface). In addition to normal text, the HTML enabled editor allows you to make use of HTML tags to build your desired content.

Perhaps an indication of your help desk’s operating hours and timelines for support responses? With a link to contact a Customer Support Manager for any critical issues?

Or maybe a more personalized guideline on how they can use the help desk to submit their requests and/or browse the Knowledge Base?

So go ahead and speak out through your help desk. Yet another step in ensuring that your help desk reflects your corporate image as much as possible.

We have a few customers who’ve put some creative thought in the messages they wish to convey and we’ll be covering some of them on the blog, shortly.


Tip of the week – Selecting a color for your custom status


Using custom statuses, you can replicate your business processes as closely as possible and more efficiently identify tickets in your help desk. Being able to visually identify a ticket’s status through a brief glance is aided with the custom colour options for each status that you create.

The add/edit status form allows you to define a preferred color for the status, aside from other status related settings. Till recently, the hexadecimal HTML color code had to be entered to have the relevant color assigned to that status.

We’ve now made it even easier to select a color for any custom status that you create. Simply enter the name of the color you wish to use for the status and you’ll see it appear right alongside the color field. (If you still prefer to use HTML codes, you can!)

Screen_shot_2011-05-18_at_4


In this example, the “Open” status has been set to be displayed in “Blue”. Any tickets in the queue that are placed in the “Open” status can then be visually identified, by merely looking at the status color.

Screen_shot_2011-05-18_at_5

With regular help desk usage, it’s quite natural to identify a ticket by glancing at the status color rather than the status name itself. Such visual associations then make it easier to navigate through one’s ticket queue and easily stay abreast of the current state of any ticket.

Are you using custom statuses? Let us know. 


Tip of the week – Choose the number of tickets to be displayed on a single page view


Following up to the flexible My Queue feature that we covered last week, we’ve got another handy tip related to customizing each help desk staff member’s user interface.

Preferences typically vary from one support staff to another, in the manner in which they would like information to be displayed to them.

One of your staff members may wish to have as low as 5 tickets displayed in a single page view; another may prefer to have 20 in a single page, to make it easier to navigate through their support activities.

Helpdesk Pilot understands this need and allows each of your staff members to define the preferred number of tickets per page view. Albeit a simple one, this custom setting contributes significantly in offering help desk staff members with an ambient user interface. 

The “My Settings” page within each staff panel offers a setting to define the number of tickets per page.

Screen_shot_2011-04-13_at_4

Once set, the tickets view page will display all tickets in the help desk according to the number of tickets per page breakup, for that specific staff member. Remember, each of your staff members can have their own preferred view! (This page view would extend across all the status filters as well)

Did you find this useful? Leave a comment and let us know!


Tip of the week – The Message snippet


Oh well, guess I missed a week in between and a tip in between. Will make up for it in the coming days, I say!

So, when an email comes into your help desk installation, the ticket appears along with the Ticket ID, Subject, the default status in your installation and the time stamp on the right (mouse over the Last updated area to get the exact timestamp!). A snippet of the body of the message is also shown below the subject. 

Media_httpdldropboxco_giztl

The one new improvement in this feature from all older versions is that, the latest client reply is now shown in this message snippet instead of the original message always being shown there. So, imagine getting a short response from your client, and viewing the full message right on the Tickets View page. We believe this helps in reducing the time your staff spend viewing ticket updates and can sometimes even use the Quick reply feature to update the client right there. Like this, 

Media_httpdldropboxco_cejvk

Useful? Leave us a comment.


Tip of the week – The Red Dot


Media_httpdldropboxco_jkygw

Remember The Red Dot episode from Seinfled, the greatest show ever? (Tenmiles has a serious bunch of Seinfeld fans too). Read on to see what our very own red dot in Helpdesk Pilot means.

Media_httpdldropboxco_orvfg
The red circle that may appear at the end of the ticket box, indicates that the last reply on the ticket has been sent by the customer. This can be particularly useful while going through the tickets on the Ticket view page to immediately identify those tickets which requires the staff’s attention. Once the ticket has been replied to by the staff, the red circle will go away and be replaced by a more soothing grey one. 

Media_httpdldropboxco_secan

Your staff can now go ahead and work towards attending to those tickets with the red dot, just by taking a glance at the tickets view page. 

Useful? Leave us a comment.


Submitting a support ticket on behalf of your customer


The majority of support requests are sent in either via email or submitted through web based forms.

However, there is a large percentage of customers who prefer to phone in their requests and be assisted by a customer support agent; to these customers, the element of human presence provides them with a certain level of comfort that their request has indeed been acknowledged.

Helpdesk Pilot takes note of this important requirement and provides your support agents with the option of submitting a ticket on behalf of the end user/customer.

Whilst logged in to the Admin Panel, your Customer support agent needs to merely click on the “New Ticket” link, located at the top right hand corner of the panel (shown below), to bring up the ticket submission form.

With the customer on the phone, your support agent can then fill in the ticket submission form while prompting the customer for the information required in the individual fields. The ticket then enters your Helpdesk Pilot ticket queue, awaiting response from the concerned support agent.


Search Support Tickets using ticket number


Media_httpwwwhelpdesk_ganjb

Search Tickets by ticket number. Just type the ticket number in the search field to get to a particular ticket number. Example, ST0000012 will look for ticket ST0000012. Alternatively, you can search for 0012 (at least 4 digits are required).


Powerful (and hidden) Search Filter


Media_httpwwwhelpdesk_ckjgl

Wanted to filter tickets based on the staff member it is assigned to? Wanted to know the tickets that have not yet been assigned to anyone? We have a solution. Helpdesk Pilot 2.2.0 (and above) offers a staff based ticket filtering and you don’t have to look around to find how you can apply this filter. Just use the search box. Search for staff: john to list all tickets assigned to john. And to list all tickets that remain unassigned search for staff: none. It’s simple, quick and can be used in conjunction with other status filters available. Click here to see examples and screenshots of this useful feature.


Don’t move, Split it!


Media_httpwwwhelpdesk_crljj

A typical life-cycle of a new ticket at Helpdesk Pilot daybreakers download begins with Pre-Sales moves to Sales , occasionally then passed on to the Installation Department and finally lands up with the Support team. By now the ticket is already over 20 responses long and the original message of the customer is irrelevant and out-dated. This is where Split Tickets introduced in 2.5.0 comes very handy. Click here to see how split tickets feature works. So, next time you want to pass a ticket to another department consider using Split Tickets option.